Food
Food 

Discovering Haupia: The Hawaiian Coconut Delight
Imagine yourself reclining on a sunny Hawaiian beach, sand between your toes, delighting in the creamy, coconutty bliss of Haupia. This traditional Hawaiian treat, often savored as a pudding or pie filling, is a fixture at festive luaus and cozy gatherings across the islands. With a desire to share this tropical joy with my vegan buddies, I embarked on a mission to create a vegan-friendly Haupia, adding my unique twist to ensure everyone at my table could indulge.
The magic of Haupia lies in its simplicity, using cornstarch as a thickener which happily keeps the dessert vegan. My twist? Amping up the texture and flavor. Opt for full-fat coconut milk for that rich, velvety feel that’s true to the dessert’s roots. By focusing on a lush texture and uncomplicated cooking methods, this vegan Haupia recipe promises to transport a slice of Hawaii into your kitchen, no airfare required!
Crunch Time: Making the Perfect Vegan Macadamia Nut Crust

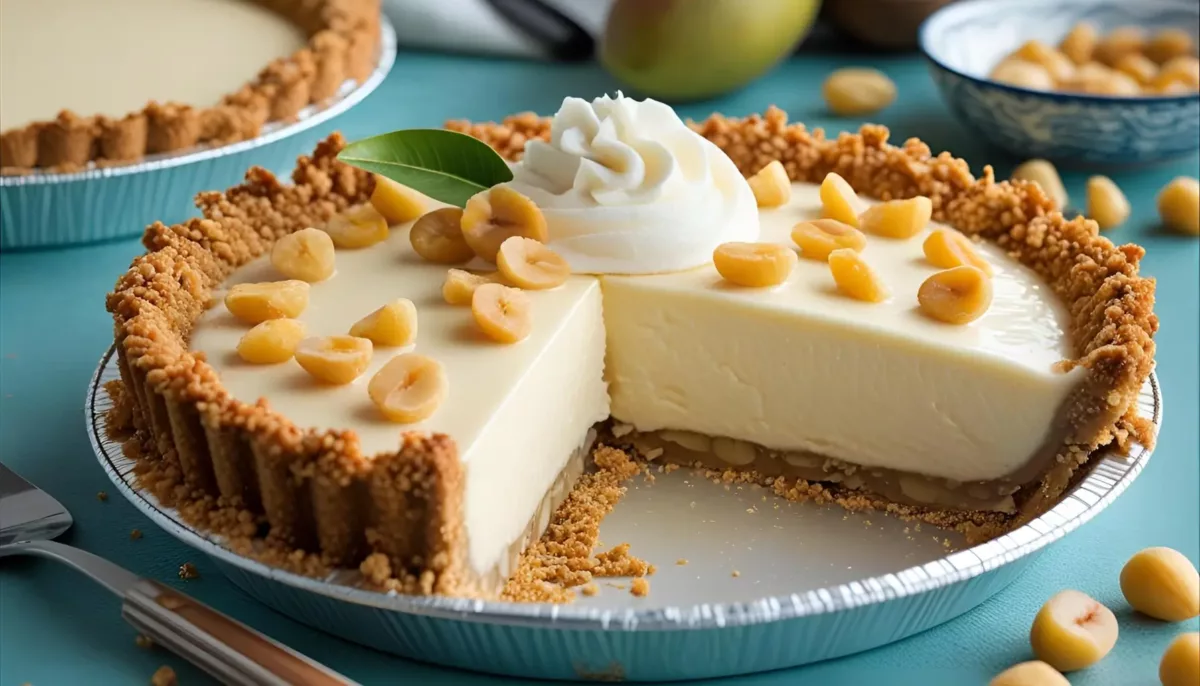
The foundation of any memorable pie is its crust. Eschewing conventional pastry bases, I chose macadamia nuts for their luxurious, buttery essence, a nod to Hawaiian abundance. The nuts’ natural crunch fantastically offsets the Haupia’s smoothness, making every bite a textural delight. Plus, this crust is a snap to make and entirely no-bake, preserving all the wholesome goodness of the ingredients.
Start by blitzing raw macadamia nuts with dates in a food processor until you achieve a crumbly yet cohesive mix. Dates sweeten the deal and keep the crust together, while a hint of salt and a dash of vanilla enhance the tropical vibe. Press this mixture firmly into your pie dish, then chill in the fridge to set—voilà, your crust is ready to go!
Layering Flavors: Assembling the Vegan Haupia Pie
With the crust set, it’s time to shine the spotlight on the Haupia. In a saucepan, blend coconut milk, a bit of vanilla extract, and your favorite vegan sweetener—I’m partial to agave syrup for its subtle sweetness. Heat gently, and incorporate cornstarch dissolved in water, stirring continuously until the mix thickens to a custard-like consistency. Evenly spread this luscious filling over your crust, smoothing out the top as you go.
The toughest part? The wait. Allow the pie several hours in the fridge to firm up, letting the flavors meld into perfection. During this time, feel free to sway to some vintage Hawaiian tunes—this definitely enhances the pie (or at least the making experience)!
ADVERTISEMENT
Sweet Endings: Garnishing and Serving Your Tropical Masterpiece
Finishing touches can elevate your Haupia pie from great to unforgettable. Whip up some coconut cream with a sprinkle of powdered sugar for a fluffy, airy topping. Add a scattering of toasted coconut flakes and crushed macadamia nuts for crunch, bringing those island vibes full circle.
When it’s time to serve, unveil your creation and watch as it brings joy and surprise to the table (or just treat yourself—totally valid!). A slice pairs wonderfully with robust coffee or a cool iced tea. Each bite doesn’t just taste divine; it’s a mini Hawaiian getaway on a plate. Dive into this culinary adventure, and don’t forget to spread the aloha spirit with every delicious piece!
If you enjoyed this recipe or have suggestions on how we can improve it, please leave us a comment below. Also, make sure to check out other dishes I’ve created or stories I’ve written about food culture – here.